WHAT I KNOW AND HOW I LEARNED IT
© Sharon Ann Burnston 2005, 2010, 2012, 2013, 2017, 2018
Introduction
Choosing Suitable Materials
Cut and Construction
Patterns You Can Use
How to Fit a Shift to Your Body
Shift Neckline Woes
Sewing the Shift
Stroke Gathers
Ruffles
Monogramming a Shift
FAQs
Replica Shift
STROKE GATHERS
The stroke gather technique forms a row of neat, precise gathers which look neither like regular gathers nor like pleats. They are actually more akin to smocking. Once you are familiar with the distinctive look of stroke gathers, you will begin to notice them in 18th c. portraiture.

1745 - Lady Ann Wemyss by Allan Ramsay

1747 - Greenwood Lee family by John Greenwood

1748 - Mrs Inman by Robert Feke

1748 - Elizabeth Erving (Mrs James Bowdin II) by Robert Feke

1752 - Mrs Tench Francis by Robert Feke

1759 - Simplicity by Jean Baptiste Greuze

1765 - Nathaniel Hurd by John Singleton Copley
1770 - Mrs Humphrey Deveraux by John Singleton Copley

1772 - Samuel Adams by John Singleton Copley

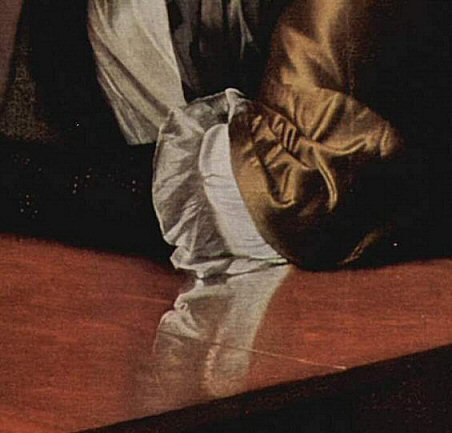
1773 - Mr and Mrs Thomas Mifflin by John Singleton Copley

1780 - The Milkmaid by Jean Baptiste Greuze

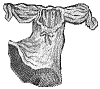
original 1752 Connecticut shift cuff, detail

Here also is an image of the basic technique from the Encyclopedia of Needlework by Thérèse de Dilmont.

STROKE GATHERS, HOW TO:
Stroke gathering used to be a commonly taught skill, if we can judge from old sewing manuals:
The workwoman's guide By A Lady, 1838 https://books.google.com/books
Encyclopedia of Needlework by Therese de Dillmont, 1886 https://www.gutenberg.org/
Hand Sewing Lessons, by Sarah Ewell Krolik, 1905 http://chestofbooks.com/ and http://chestofbooks.com/
The Dressmaker, by Butterick Publishing Co Ltd, 1911 https://archive.org/
Every manual describes the process in some detail. So, in clear modern terms, what do they say about how to stroke gather?
The "Lady" of 1838 tells you all of it pretty clearly-she says to cut everything evenly and straight, divide the length to be gathered into quarters and mark these points, put in a row of evenly spaced running stitches (she says to take up three threads and skip four with every stitch), draw this up snugly and stroke each gather downward, one at a time with a "large needle". Then space it out so that it matches the quarter points on the edge it is to be sewn to, and then stitch each gather one at a time.
Therese de Dillmont tells you to run a line of running stitches, each stitch covering three or four threads of the fabric and then skipping three or four, then she tells you to pull up this gathering thread and stroke down the gathers with "a strong needle", so that they lie evenly side by side, while supporting the work from the back with your other hand. She then has you run in a second row of running stitches to secure the stroked gathers before you sew them into your cuff.
Sarah Krolik tells you to gather and not to draw the needle through (on a 5" practice piece) until all of the stitches are taken up onto the needle. She says to secure the gathers by winding the gathering thread around a pin, and to use "a No, 6 [i.e., large] needle, begin at the left side, and stroke the gathers straight downward, with care not to injure the fabric, and lay them closely between the left thumb and fore-finger." She then has you adjust the gathers to the size of your cuff or wristband and "hem" each gather to the right side of the band.
The Butterick folks also tell you to secure the gathering thread by wrapping it around a pin. They further tell you to hold the work between the thumb and fingers of your left hand and press each pleat, or "plait", under your thumb as you stroke with the needle. You are cautioned not to use the point of the needle as this might damage the fabric, but you are advised to stroke upwards above the gathering thread as well as downwards below it.
As you can see, the general principles are the same, but in the details, there is more than one way to execute a set of stroke gathers! I'm going to tell you how I do it. Whether I'm stroke gathering a shift cuff or the entire top of an apron, it's pretty much the same method. Feel free to adapt the technique in ways that work best for you.
- I make sure I have cut everything straight and square, by cutting along a pulled thread when I cut out all my pieces. I mark the midpoint and the quarter-points of the line to be gathered, either with a pin or with a dot of pencil, washable ink, or something else that won't show. You can also mark eighths, but I find that this can get confusing, so I don't.
- I thread a medium size needle (a 9 or 10 "between") with a thread heavy enough that I can gather without risk of it breaking; I usually use Americana quilter's weight thread. I cut my thread slightly longer than the length I need to gather, so that the fabric can still lie flat after the first row of running stitch is in. I wax my thread well. I make a big fat knot at the end of my thread and begin so that the knot stays on the upper side of the fabric as I'm working.
- I put my first line of running stitch about 1/4" from the edge of the fabric. I pick up the exact same number of threads, and then skip the same number of threads, every single time. (usually, four threads of the weave.) I do not pull out a thread to sew along, as this weakens the fabric. (You will notice that *none* of the old sewing manuals suggest pulling a thread to sew along.)
- It's important that the line of gathers be on grain. It's almost as important that the stitches you take up be even. So I work in very good light and take my time.
- When I finish my first row of stitches, I make an equally fat knot on the other end of my thread, and I make sure this knot is also on the uppermost surface of my fabric.
- In my experience, if I try to stroke the gathers after one row of gathering stitches, it doesn't go well. So I put in a second row of stitches, about 1/4" below the first row. I do this row just like the first, keeping it equally on grain, and trying to keep the stitches aligned vertically too, as much as possible, by picking up the same threads of the weave and skipping the same threads as I did the first time. If you have done this correctly, when you draw up your gathering threads, the gathers will form neat and precise little columns of tiny pleats. For very ornery fabric, one could put in a third row, although I have never had to.
- I then draw the rows of gathers up really tightly for a few seconds, before I begin to stroke the gathers. I found out the hard way that if you stroke upwards, towards the raw edge of the fabric, the stroking process can cause the raw edge to come apart and fray, so I don't recommend this. I stroke downwards, each pleat or gather, one at a time. I usually use the blunt end of my gathering needle, although a fine knitting needle or blunt-end tapestry needle works well too. The sharp end of the sewing needle can be used too, but only if you are extremely careful, so why run the risk? I don't usually support the work with my hand, I prefer to rest it on a surface like my cutting mat, which is firm and flat but just a bit resilient. It can help in stroking the gathers if I secure at least one end of the gathering threads. They can be wrapped around a pin as the manuals describe, or sometimes I use a bit of tape to secure them to my cutting mat. Sometimes, if I am working on my lap, I have even been known to pin them to my jeans.
- After the gathers are all stroked and nicely aligned, I prefer to keep the work tightly drawn up and set it aside overnight, to help set the little pleats.
- Next I prepare the cuff (or whatever edge the gathers are going to be sewn to). I press under the raw edges of the cuff a scant 1/4" all around. After all the seam allowances are turned under and pressed, I mark the center point and quarter points along the edge where the gathers will be sewn
- When I am ready to attach the gathers, I release the tightly drawn up gathering threads, and spread out the gathers until their center point and quarter points match up with those on the cuff. I pin those points and then I put in a few pins in between, but I tend to adjust the spacing of the gathers as I sew. When it all seems matched up, I secure the gathers by tying the two gathering threads together at each end in a square knot.
- Use whatever needle and thread is right for the weight of your fabric (probably one size smaller than the needle and thread with which you did the lines of gathering). Wax the thread. Knot the end and bury the knot inside the folded edge of the cuff.
- Pick up the first gather with the tip of the needle, taking only 2 threads of the uppermost edge of it. Then take 2 threads of the edge of the cuff. Continue across, picking up 2 threads of each gather and then 2 threads of the edge of the cuff. By the time I have worked the first inch or so of sewing the gathers to the cuff, I can get a feel for how to space them. A little crowding here and wider spacing there won't show when it's done, but the quarter points and half points should match.
- When I get to the other end, I knot off my thread and bury the thread end.
- Then it's time to turn the work over, fold down the other long edge of the cuff, and repeat. You will notice that the "hills" of the stroke gathers on the first side are the "valleys" on the second side, so that in sewing this twice, you are catching both sides of each gather to the cuff. This time the needle will be picking up 2 threads on the "valleys" of the pleats, and 2 threads of the other long edge of the cuff. I sew the short ends of the cuff closed last. You can remove your gathering threads or not, as you prefer. I usually leave in at least one row of gathering thread, that way in case I ever have to remove and replace a worn out cuff, the gathers are still held by their gathering thread.
All this is time consuming, because it requires care and precision. It creates beautiful and historically accurate results, with a distinctive look. But is there any way to speed it up? What about those of us with aging eyes?
I can recommend one shortcut.
It's a quilter's aid called "Tiger Tape", it's an adhesive, repositionable tape marked in regular intervals to guide you in making uniformly sized hand sewing stitches. If you look around, you can find it marked for 12 stitches to the inch.
http://www.createforless.com/Old-Made-Quilts-Tiger-Tape
If you're careful to line this up on-grain on your fabric, it may enable you to stitch the lines of gathering stitches relatively painlessly. It's ¼" wide, so it's the correct width that you can sew both the upper row and the lower row without even having to reposition it. If you have trouble sewing stroke gathers the traditional way, you might want to give it a try.
Introduction
Choosing Suitable Materials
Cut and Construction
Patterns You Can Use
How to Fit a Shift to Your Body
Shift Neckline Woes
Sewing the Shift
Stroke Gathers
Ruffles
Monogramming a Shift
FAQs
Replica Shift

Home
Website Copyright © 2002 - 2022 by Sharon Ann Burnston
Web site designed by Sandy Cheney