Baby Linen
or How to Make a Basic Essential Layette
for Eighteenth Century Re-enactor Infants
Shirt
All 18th c. infants wore front opening shirts, not shifts. These shirts could be highly ornamental, decorated with needle-lace and bobbin-lace (Buck, fig 2 & 2A; Baumgarten, figs. 223 & 224), absolutely plain (Buck, fig. 1; Burnham, fig. 14) or something in between (Burnston, Fitting & Proper, pp. 77-78)
Two lace-trimmed shirts from the Museum of Fine Arts, Boston, can be seen online:
Example 1 (49.360) Example 2 (37.462)
 Click photo for larger view. |
There is one distinctive style of absolutely-plain infant shirt, of which I’ve been able to find five examples so far, all virtually identical. One (99.839) is at the Museum of Fine Arts, Boston. The one diagrammed by Burnham (her figure 14) is in the Royal Ontario Museum while the one depicted in Buck (her figure 1) is at the Costume Museum in Bath. |
Several of the shirts of this cut and construction are in the collection of Historic New England, (one of which will be described in detail in my forthcoming book)
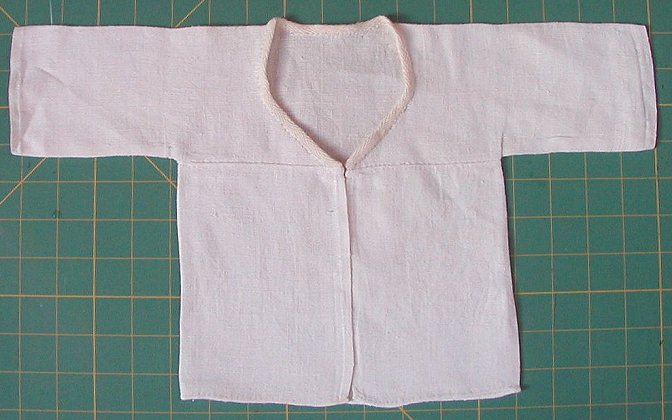
This is as simple as an 18th c. baby-shirt could be.
The originals were made from linen approximately 17" wide. The modern equivalent would be white linen dish-towel fabric, if you can find it. A good solution is a soft vintage linen tea-towel; if all-white and in sound condition. Each towel will probably allow you to make two shirts. The benefit of using 17" wide fabric is that the selvedges form the sleeve edges and center-front edges, thus requiring no hemming except at the bottom of the shirt. If you cannot find 17" wide fabric, you’ll simply have to do the additional work of hemming the sleeves and center front edges.
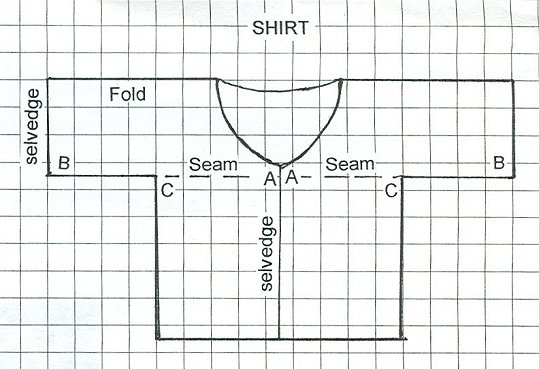
shirt pattern and cutting diagram Click all graphics for larger view. |
To make the shirt: (Each square of the grid = 1") 1. Cut a piece of white linen 14" x 17" (if you’re not using 17" wide toweling, cut it 14" x 18", to allow for hems). 2. Hem bottom edge, as narrow and neat a hem as you can manage. 3. Cut out neck opening as shown. Cut each side, from A/B to C as shown, and fold as shown for shoulders and for sides, matching A’s, B’s and C’s. Sew underarm seams and chest seams with a ¼" seam allowance. Press each seam to one side and sew all raw edges of seam allowances to the shirt with a slipstitch or herringbone stitch, to prevent raveling. |
shirt assembly
shirt detail, seam finish, from inside 
|
4. If necessary, hem sleeve ends and CF edges. Make as narrow a hem as possible. 5. Bind neck opening with ½ wide fine cotton twill tape. Cut tape 14" long, slipstitch it to outside of neckline. Fold over, enclosing all raw edges and turning in short edges of tape, and slipstitch other side of tape to inside of neckline. The shirt has no fastenings. It is held closed by the petticoat, and belly band if you choose to use one. Options for ornamentation: All known surviving examples of this style of shirt are entirely unornamented. You could probably add a frill of fine linen or cotton batiste around the neck. Cut the strip 1 ¼" x 22" for the frill, hem all edges with as narrow and fine a hem as you can, gather one long edge to equal 13", and whipstitch it to the neckline. To construct a fancier shirt, see Burnston, Fitting & Proper, pp. 77-78, or the shirt instructions in the Mill Farm Infant Gown pattern. |

pattern diagrams may be copied for personal use,
all other rights reserved
http://villagegreenclothier.com/showroom/infantclothes.html
-
Introduction
- Cap
- Diaper, known in the period as "napkin" or "clout"
- Pilch or Pilcher, a diaper-cover
- Shirt
- Petticoat
- Roller, swaddling-band, belly-band, or "surcingle"
- Bed gown or robe
- Bib, also Drool cloth, burp cloth, the "muckinder"
- Stockings, Shoes, Booties
- Baby sling, baby carrier
- Blanket, basket, bedding
- Final Reminder
Sources
Baby Swaddling Photo Series
Baby Gown Photo Series

Home